This tutorial shows how you can easily run all your tests from a Gitlab pipeline. We assume that your current pipeline is already able to build and deploy your software. This tutorial contains the following steps to complete this task:
- Get your ApiKey from testup.io to authenticate your Gitlab pipeline
- Insert the ApiKey into a secure space as a Gitlab variable.
- Extract the Id of your schedule
- Setup the Gitlab pipeline to run your tests
- Optional: Make temporary changes to the settings in your test
1) Get your ApiKey from Testup
Go to your testup.io start page and click on the “Profile” tab. Find your ApiKey und the section “Api Keys”

2) Provide your ApiKey to Gitlab
Since the api key gives full access to your testup settings it should be provided to the Gitlab pipelines in a secure way. To do this open Gitlab and follow these steps:
- Open the project settings
- Open the CI/CD section
- Expand the Variables section
- Press “Add variable”

Once you successfully opened the add variable dialog you can provide your details as follows:
- Change your variable’s name to “TESTUP_APIKEY”
- Paste the Testup ApiKey into the value field
- Uncheck the “Protect variable” box (or alternatively protect your pipelines that should run your tests)
- Press “Add variable” to complete the setup

3) Find your Testup schedule Id
In this step you must find the numeric Id of the schedule running your tests. For this step you navigate to your project in the browser. From there you open (or create) the schedule, such that you see a domain that it has the form http://app.testup.io/schedule/<scheduleId>?… Keep that schedule Id ready as you will need it in the next step.
4) Setup your Gitlab Pipeline
We assume that you already have a running pipeline that builds and deploys your project. Testup can only run your tests with access to a deployed version of your software. Therefore, you need to add the end-to-end test as a final stage in your build pipeline. Go to your stages section and add e2e-test. Your file .gitlab-ci.yml will probably look something like this:
stages:          # List of stages for jobs, and their order of execution
  - build
  - unit-test
  - deploy
  - e2e-test     # Add this stage here
As a next step you add your end-to-end test step at the end of your pipline description. Your new pipeline step can be inserted as shown below. Don’t forget to provide the correct schedule Id.
Testup:   # Run this job after deployment completed successfully
  stage: e2e-test
  image: curlimages/curl
  variables:
    SCHEDULE_ID: <YourScheduleId>
  script:
    - URL="https://app.testup.io/cicd/schedule/$SCHEDULE_ID/run/$CI_JOB_ID"
    - curl $URL -H Authorization:\ ApiKey-v1\ ${TESTUP_APIKEY} -s --retry 12
    - curl $URL -H Authorization:\ ApiKey-v1\ ${TESTUP_APIKEY} -s --fail
How exactly does this step work technically? First, it starts with an image that provides the “curl” command. Then it builds the url that triggers the start of the pipeline. This url contains the schedule id to run as well as the Gitlab job id to distinguish update requests from new runs. Following these preparations two curl commands are issued. The first calls Testup and retries until the test is either marked as failed or passed. Until ready the endpoint returns a 504 timeout code along with some early debug information. This first curl also makes sure that your pipeline’s debug messages contain useful information and a link to the corresponding resource in Testup. The second curl is necessary to make the pipeline fail if the tests failed.
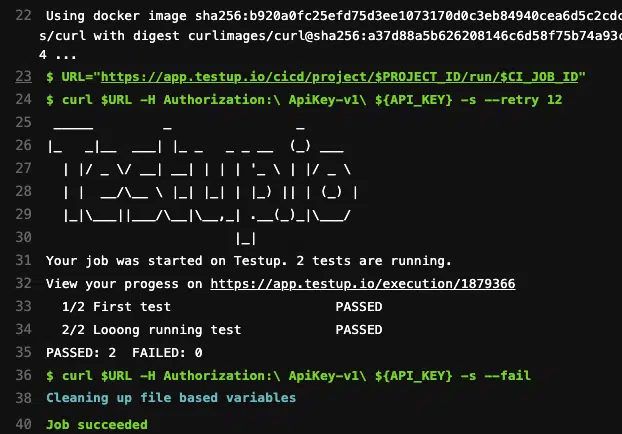
Once your pipeline is set up you will see a debug message in your pipeline that looks something like this:
5) Optional: Provide additional settings to your test
Very often it is necessary to run your pipeline tests with other values than the ones used in interactive editing. Common cases are temporary domains or changing parameters for users, passwords etc. You can provide additional parameters in the message body of the curl. It is possible to replace urls and text contents that occur in your test. Your pipeline would then look like this:
Testup:   # Run this job after deployment completed successfully
  stage: e2e-test
  image: curlimages/curl
  variables:
    SCHEDULE_ID: <YourScheduleId>
  script:
    - URL="https://app.testup.io/cicd/schedule/$SCHEDULE_ID/run/$CI_JOB_ID"
    - curl $URL
      -H "Authorization:\ ApiKey-v1\ ${TESTUP_APIKEY}"
      -H "Content-Type: application/json"
      -s --retry 12
      --data '{
       "message": "Execution title shown in testup.io",
       "variables": [{"name":"some_var", "value":"some value"}],
       "urlMap":[{
        "old":"https://stage.example.com",
        "new":"https://qa.example.com",
        "regex":false
       }],
       "textMap":[{
        "old":"OriginalValue",
        "new":"NewValue",
        "regex":false
       }]d
      }'
    - curl $URL -H Authorization:\ ApiKey-v1\ ${TESTUP_APIKEY} -s --fail