Posted on Leave a comment

No-Code Test Automation Grabs Center Stage

Test automation is rapidly evolving today. More specifically, no-code test automation siezes the center stage because, with this AI-powered testing platform, non technical members can design and execute test cases to verify new app releases! No-code test automation with apps like TestUp dissolves the dependency between engineers and semi-technical staff in enterprises. Now, any and all business intelligence (BI) members can take charge of verifying elements of an app whose performance is their particular priority. We are now exploring a contrast between low-code automation and truly automated testware. What are the tangible benefits of codeless test automation?

  • Easy to create test cases – even for non technical users
  • Quickly update test cases on app revisions
  • Keep pace with development cycle of CI / CD
  • Reduce QA budget – no engineers needed
  • Build tests across all hardware platforms
  • Users can easily understand each others’ test cases

The groundbreaking benefit of no-code testing is to bring intelligent testing within the capability of all enterprise members, including product owners and business analysts. This reduced dependency on engineers is said to democratize software testing. It makes testing more accessible and less costly. It also makes the dialog of issue resolution much more accessible. The heavy code based regression testing is replaced by a light intuitive interface.

Illustration 1. Shows how easily we can create a no-code test. In this example, search input and results are verified for a UI by the computer vision algorithm.

Another important trend in test automation is hyper automation. Software industry experts widely predict that hyper automation, which entails the combined use of AI, ML, NLP methods as well as RPA – Robotic Process Automation, will rise to a position of common use in coming months. The goal of hyper automation tools ultimately is to replace human intelligence where possible and accelerate those tasks in which human capital is not absolutely necessary. In the field of test automation, experts predict that AI and RPA will also assist human testers for such tasks as  automation of test case reporting and alerts. 

Transcending Coded Test Cases          

While Selenium automation testing owns much of the market because of its comprehensive support by the most popular programming languages such as Python, Ruby, and Java, the design of test cases with Selenium still requires coding skills. Selenium WebDriver and Selenium Grid are still the domain of developers and QA engineers, and business-facing members remain dependent on those engineers to orchestrate test cases in conjunction with the CI / CD environments. Such dependency now vanishes with no-code test automation.

The new generation of codeless testing tools are based on artificial intelligence components including computer vision modeling. Computer vision algorithms can quickly verify page rendering completeness. Using machine learning methods, the new AI-powered test automation tools can also evaluate performance metrics to assist in understanding user experience. And the exceptional advantage is that anyone can create test cases with the intuitive UIs and dashboards. AI-based no-code testers can even send alerts to endpoints using email or Slack when critical issues like authentication credentials appear to be compromised during test execution. No-code test platforms also integrate with CI / CD pipelines more quickly and easily than coded testing.

Rapid Test Case Updates 

In all types of testing, including performance, functional, and regression testing, AI-powered test automation expands previous boundaries by increasing the longevity of test cases. The self-healing test case is a prime example in UI testing with computer vision. AI-based test automation tools are capable of real-time learning by consuming data generated by their own  output at each test run. For example, when a new version release removes a page element expected by a test case, AI test bots can learn to recognize equivalent or alternate elements so that automated browser test cases do not break. The benefits of such AI-driven testing which self-heals at run-time include increased longevity of test cases and reduced QA testing budgets.
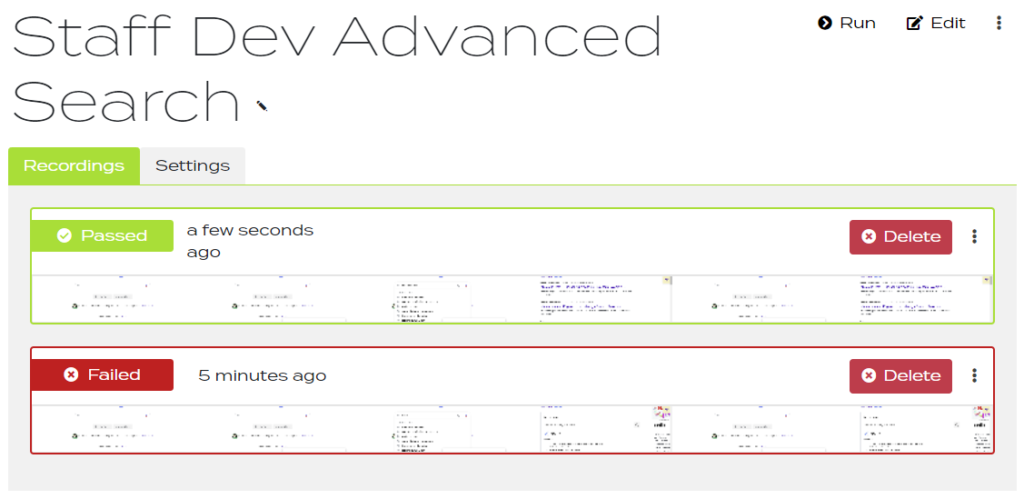
Illustration 2. We can run existing codeless tests easily from the dashboard to quickly verify the status of the application under test.

Keeping Pace with DevOps

Code-heavy test automation which requires developers and QA engineers to maintain often results in a testing suite that lags behind the rate of release for new software versions. No-code test automation resolves this problem because test cases can be designed quickly by team members of varying technical knowledge. Intuitive UIs combine with computer vision methods to instantly create test cases in tandem with application development. Bugs can then be identified and reported by all concerned endpoints. Expert testing is no longer limited to QA members. Continuous integration and continuous delivery now flow efficiently and are no longer delayed at the QA stage.

No-Code Tests Reduce Expenses

Startup AI enterprises often need to optimize human capital to reduce operating expenses. Very often this means developers will also do functional and regression testing, and often code the test cases themselves. This is relatively expensive when AI test automation apps can take on the work of QA. Moreover, a feedback loop can evolve when there are not enough fresh eyes on a project. AI can provide the much needed objectivity by way of automating tests and generating its own code. It is also useful to note that many such test bots make their auto-generated code available via editor for revision by qualified team members. But we are now moving into an era when manual coding is obsolete and expensive. No-code testing automation is the budget-friendly QA department enterprises need.

Platform-Independent Testing

Among the most refreshing aspects of no-code automation testing is its total independence from device and OS constraints. Computer vision-based testing in particular is totally portable across mobile, tablet, and laptop UI. Very often, creating test cases is a simple matter of drawing selection boundaries around UI elements under test. Subsequently, any user can click the run button and examine the outcome. In other words, the computer vision algorithm does not care whether its imaging target is running on a phone or a tablet or a desktop. The same outcomes will be reported by the testing tool.

Interoperability Across Staff Domains

The technical jargon of developers and engineers has always been an obstacle which decelerated the work flows in organizations with both tech and non tech staff. The problem extends into the realm of testing because QA is a buffer zone with a lot of interaction between developers and users. This zone has been peppered in recent years with spurious attempts to create testing tools for non technical members. Such attempts included low-code tools or testing languages like Cucumber, which was supposed to be usable by non technical members. It turned out, however, to be another language for developers to learn, and actually increased the overhead of testing and app development! Fortunately, true AI-based no-code testing now rescues all members from this additional tedium and expense by making testing accessible to everyone.

The Future Now of No-Code Test Automation

We are now witnessing the transformation and revival of test automation from drudgery to exciting new potential. The creative new wave of AI in test automation is making this revival a frontier which everyone can partake of. New apps like Testup are leading the charge to fast and efficient testing for tech savvy and non tech members alike.  Of course, the expert knowledge domain of testing will be in an energetic flux for years to come. AI will inevitably evolve to advanced image recognition and DOM element recognition to improve the flexibility of browser and UI testing. Algorithms in design today will do amazing feats like capturing data from test revisions and predicting components of new test cases to further reduce overhead of test case revision. Stay tuned to TestUp as we stay on the front lines of this exciting new frontier!

Posted on Leave a comment

Test Like A Genius!

Do you know automated testing, but still find it difficult? If yes, you have come to the right place as we are going to discuss why some users find automated testing hard and a specific automated testing tool called “Testup” which makes automated testing easy.

Let’s begin!

Why some people find automated testing hard

Most of the time, good programming knowledge is essential to perform automated testing as it requires to write programming codes. If the tester has no or little programming knowledge, then he or she will find it hard to write required codes. As a result, automated testing becomes hard for them.

However, there are some automated testing tools such as Testup that helps to perform automated testing without writing any programming codes, and it is beneficial for many users who have no or little confidence with coding.

Testing frameworks like Selenium is very complex, and that makes it harder to perform test automation for a beginner. Further, the tester needs to choose the most suitable testing tool for his or her testing task.

What is Testup

Testup is a visual test automation tool to test web applications and it is one of the easy test automation tools on the web. It was developed and maintained by Thetaris GmbH, a group of software professionals. Further, Testup is a no-code automation testing tool. Hence, there is no need to write any code to test the software.

Why do we need to use Testup

There are several automated testing tools available in the industry. But, to use some of the automated testing tools, the user needs to have some advanced knowledge and experience in test automation. However, Testup is different compared with most of the automated testing tools, and it is simple and straightforward to use. Learning Testup is easy, and learning resources can be found on the official website of Testup.

Unlike automated testing tools like Selenium, Testup’s visual approach allows the user to carry out test automation without coding. The time required for recording a test can be reduced by the no-code editor of Testup.

Testup can capture more bugs than with manual effort and also capture more bugs before they hit their users. It is also easy to set-up the test environment and takes just a few minutes as Testup is one of the best user-friendly testing tools.

The accuracy of Testup results is high as there is no or little human error involved. Further, the ability to test complex test scenarios with ease and unlimited interactive testing are some other benefits of Testup.

Many WordPress developers face a problem of website crashes after a plugin update. Testup provides an excellent solution for this problem by running a test to see if the website is still working as earlier after a plugin update. If the test passes, the developer can update the plugin with confidence. Further, if you are a blog owner who is not a web developer, then you can update your website and verify with Testup that it is working correctly without the help of a developer or agency.

Testup provides a 100% satisfaction guarantee to meet the expectation of their customers. If you are unsatisfied and want your money back, then they will refund you the last two months.

Considering all the above facts, Testup is an ideal automated testing tool for a user who has struggled with automated testing.

How to perform a Testup testing

Before you can start testing, you have to register with Testup. It is a straightforward and easy process. Testup has introduced two plans named “standard” plan and “enterprise” plan. The standard plan is a monthly subscription. But the user can subscribe for the 7-day-free-trial first in order to get to know the tool. To get started free with Testup, the user can just sign up here. After that, he can start testing by creating projects and tests.

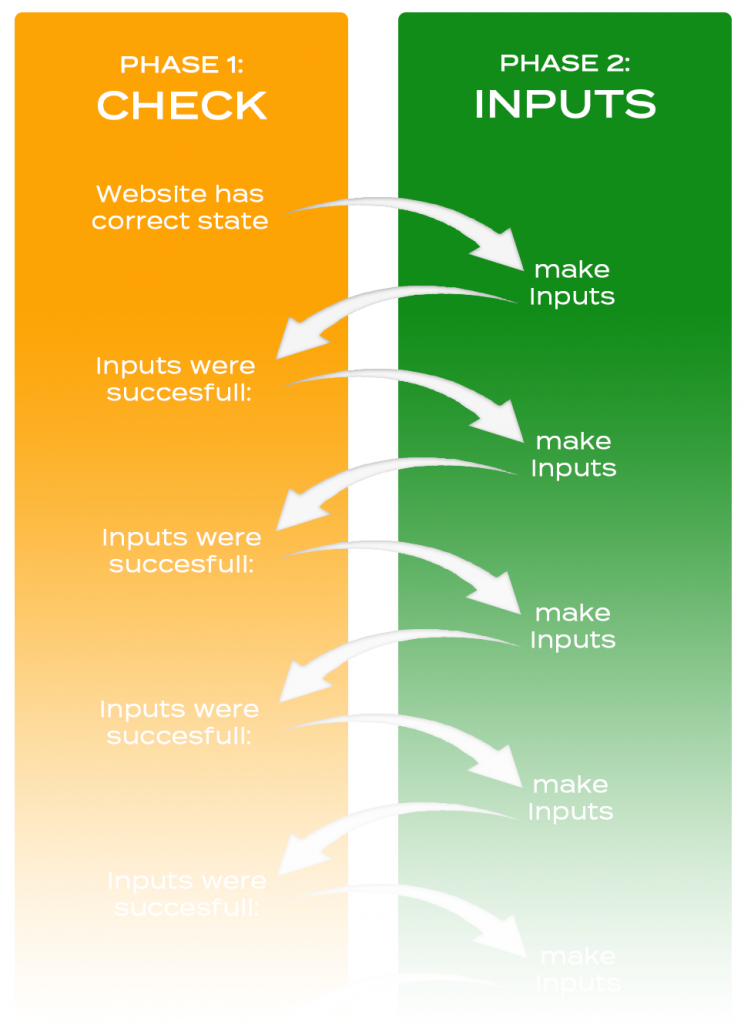
Testup testing has two alternating phases:

  • Phase 1 – Check whether the website has the correct state.
  • Phase 2 – Make inputs through clicks, swipes and keys. 

A restart of Phase 1 – Check whether the inputs were successful. If yes, can proceed with the next step.

Conclusion

Testup is an excellent automated testing tool for users that know about automated testing but found it too hard. Various features of Testup enable the user to test the software with ease and obtain accurate test results.

We hope you enjoy this article. Happy Testing!

Posted on Leave a comment

Fixing Common SSL Issues in WordPress

Several errors can occur when trying to add SSL with your WordPress website. In this article, you will learn how you can fix these errors.

NET:ERR_CERT_INVALID Error

If you get this error, it means the SSL certificate may be expired or issued to a different domain or subdomain. Also, the browser may be facing issues trying to recognize its authority. To fix this error, you can reinstall the SSL certificate.

Mixed Content Errors

Mixed Content Errors are caused by the elements, like scripts or images, not being loaded via secured HTTP protocol. You can fix this in two ways; first is by using a plugin. The second way is by fixing the issue manually.

Fix Using a Plugin

Get the Really Simple SSL plugin from the WordPress repository. After installation and activation, go to Settings > SSL to review plugin settings. The plugin will automatically fix the errors.

Fix it Manually

First, make sure you are using the HTTPS protocol in your WordPress website settings. Go to the general settings of your website to change HTTP to HTTPS.

Once this is done, go through your website manually to check old HTTP URLs in your database and replace with the new HTTPS URLs. An easy and fast way of doing this is by installing the Better Search Replace plugin. Activate the plugin, go to Settings > Tools > Better Search Replace. Then, add the current HTTP website URL in the Search field. Afterwards, add the website URL with HTTPS in the Replace field.

Fixing the Too Many Redirects Errors

To fix this error, access the wp-config.php file and put the following code.

define(‘FORCE_SSL_ADMIN’, true);

However, in some cases, this setting can actually lead to many more redirect errors. In such case, add the following code to your wp-config.php file:

define(‘FORCE_SSL_ADMIN’, true);
//in some setups HTTP_X_FORWARDED_PROTO might contain
//a comma-separated list e.g. http,https
//so check for https existence
if (strpos($_SERVER[‘HTTP_X_FORWARDED_PROTO’], ‘https’) !== false)
$_SERVER[‘HTTPS’]=’on’;

Fix HTTP to HTTPS Redirect

You can fix this error can accessing your .htaccess file and adding the code to it.
<IfModule mod_rewrite.c>
RewriteEngine On
RewriteCond %{HTTPS} off
RewriteRule ^(.*)$ https://%{HTTP_HOST}%{REQUEST_URI} [L,R=301]
</IfModule>

Conclusion

Try the solutions discussed above and you see your WordPress website up and running, again.

Posted on Leave a comment

Ultimate Guide to WP-Staging

Websites today are increasingly complex in design. Because of the volume of code and the numerous technologies packed into a single website, an apparently simple change in code can cause an unpredictable outcome in the performance of the site. Making code revisions or other changes directly to a live website creates unacceptable risk, especially when downtime can result in loss of revenue to an Ecommerce enterprise. For this primary reason, a modern website is first developed on a staging site. Then, after testing shows that no new bugs arose from code changes, the staging site is deployed to the live site, also called “production.” WP-Staging is a plugin for WordPress sites which greatly facilitates and simplifies the creation and operation of a staging environment for WordPress sites. 

Benefits of Staging WordPress Sites

Why use a staging environment? Even a modest WordPress site often contains half a million lines of code in PHP, MySQL, jQuery, Angular, React, and much more. The backbone of WordPress sites also contains all the code libraries of the WordPress Codex, a vast resource of functions. The number of potential bugs and performance issues which can arise from a seemingly simple code revision is unlimited and represents an extraordinary risk to production of Ecommerce enterprise. WP-Staging empowers us to sandbox development risk by first revising code on a WordPress staging site. Then, only after QA has tested and verified the new version as bug-free, WP-Staging automates deployment of the new version to live production. The benefits of WP-Staging are truly persuasive:

  • Automatic cloning of existing site to staging site environment
  • Translation of live site paths to staging site paths in code
  • Detection of files which have changed
  • Automatic deployment of new app version to live site
  • Automatic rollback to previous version of code
  • Authentication provides security on staging site

How to Use WP-Staging

The first step in setting up a staging site is to clone the live or production site. In this step, WP-Staging creates a replica of your website on your server in a new location which you designate. In the setup stage, you can choose to copy the production MySQL database and include or exclude tables as required. Or, you can use the live version of your MySQL db with the staging site. As WP-Staging copies files according to your settings, it automatically revises paths in code files to point correctly to the new locations. Cloning is very fast and does not affect the performance of the live site while in progress. Several important options which you can configure for cloning include:

  • Duplicate the MySQL database for use with staging
  • Optionally use live site version of MySQL
  • Exclude specified tables in your MySQL database
  • Designate specific user access and roles

Intuitive Features of WP-Staging 

WP-Staging is a WordPress plug-in which accomoplishes an amazing set of tasks. One of the great developer-oriented features, WP-Staging color codes the new staging site WordPress dashboard to quickly and obviously distinguish it from the production site Admin dashboard. When you first sign in to the staging site and the new Admin Dashboard is bright orange, you know right away this is the staging admin panel, and there is no way to accidentally make design changes to the production site. That’s just one of many awesome intuitive features of WP-Staging.is a WordPress plug-in which accomoplishes an amazing set of tasks.

Another important feature is the automation of tedious tasks. Many WordPress users choose WordPress content management system (CMS) because it reduces the technical overhead significantly. WP-Staging amplifies this by automating many of the complex tasks of manually creating a staging site.

WP-Staging is an ALL-In-One Solution

WP-Staging features both a free version and a paid version. Only the basic function of cloning a website for the purpose of creating a staging site is provided in the free version. All the more advanced features such as migrating a site to multiple domains, and pushing an entire site to production, require the paid version. The pro version is very affordable and under €100 at the time of writing.

The daily workflow of coding changes to a WordPress site is significantly more efficient when using WP-Staging to roll out new versions of your site. WP-Staging eliminates the risk of doing so, while providing a convenient method to roll back to previous versions when needed. Using WP-Staging is very much like having a continuous integration – continuous delivery (CI/CD) engineer on staff for the low cost of a Wp plugin. WP-Staging is a great all-in-one solution for companies in need of low overhead technology and developer solutions!

References

Image captures:

https://athemes.com/tutorials/how-to-setup-a-wordpress-staging-site/

Posted on Leave a comment

A Guide to Automated Testing and Testup for Absolute Beginners

Have you never heard about automated testing? If no, you have come to the right place. In this article, we are going to discuss automated testing and a specific automated testing tool called Testup that we have built.

Let’s begin!

Introduction to Automated Testing

Software testing is the process of verifying whether the actual results of the software meet expected results. Software testing divides into two groups named manual testing and automated testing. As the name suggests, manual testing executes test cases by a human tester without using any automation while automated testing executes test cases using automation tools. 

There are some limitations of manual testing compared to automated testing, and some of them are listed below. 

  1. It consumes a high amount of time to complete a test.
  2. It consumes a lot of human resources.
  3. Possibility of less accurate results as it may involve human error.

Automated testing is introduced to overcome those limitations, and it has the following advantages.

  1. It consumes less amount of time to complete a test.
  2. It consumes less amount of human resources.
  3. Accuracy of test results is high.

Use of Automated Testing Tools during Development and Maintenance of Software

Automated testing tools can be used during the development of software to ensure that the development progressed in the right direction. Errors may occur during the maintenance of software. Hence, software testing is required, and the automation tools such as Testup can be used for testing during the maintenance.

What is Testup

Testup is a visible test automation tool to test web applications, and it was developed and maintained by Thetaris GmbH, a group of software professionals. Further, you do not need to have any coding skills as Testup is a no-code automation testing tool. 

The following list shows some of the advantages of Testup.

  1. Easy set-up of the test environment as Testup is a very user friendly testing tool.
  2. Ability to test complex test scenarios with ease.
  3. Ability to test without writing any code.
  4. Requires less amount of time and resources to learn Testup. 

Hence, Testup is an ideal automated testing tool for a user who has little or no experience with automated testing.

Registration Process

Before creating a project, you need to Register with Testup. The registration process is simple and straightforward, as shown below.

Visit this URL to go to the Testup website. Next, click on the Get started free button, and it will redirect you to the registration page.

Then, enter your email address and click on the Register button to create a new free account.

Creating a New Project

After completing the registration process, click on the Go to App button and it will redirect you to a new browser window where you can create a new project.

Next, create a new project by clicking the Create project link. To rename the project, click on the edit icon and rename.

Creating a New Test

Click on the Create Test link to create a new test and fill the parameters such as URL, etc. as per the requirement. To rename the project, click on the edit icon and rename.

For the demonstration purpose, we have used the iPhone 6/7/8 dimensions. Then click the Edit button, and it will redirect you to the Testup editor.

Recording a Test

Testup Editor

Before recording a test, you need to understand the Testup editor. There are three parts of the editor, as shown below.

  1. The left side of the editor – It contains the browser window of the website you want to test.
  2. The right side of the editor – It consists of the list of checks and inputs.
  3. The top of the editor – It is the control centre which contains all the executable commands.

Check with an Anchor Area

Selecting an anchor area helps the editor to verify that the website is correctly loaded and ready to perform the next action.

In this example, we are going to check three anchor areas, as shown below.

Check if the brand name “Testup Merchandize” is visible

Select the anchor area of the brand name (Testup Merchandize) with the mouse, as shown in the above screenshot. Next, click on the Play It button to execute the action.

Check if hamburger menu is visible

Select the anchor area of the hamburger menu with the mouse, as shown in the above screenshot. Next, click on the Play It button to execute the action.

Check if the welcome image is visible

Select the anchor area of the welcome image with the mouse, as shown in the above screenshot. Next, click on the Play It button to execute the action.

Clicking

Select the anchor area of the search icon with the mouse, as shown in the above screenshot. Next, click into the search icon. Then, click the Play It button to execute the action, and you’ll see a search input field appear above the search icon.

Text Input for a Search Function

Select the anchor area of the search input with the mouse, as shown in the above screenshot and click into the search input. Next, click on the Play It button to execute the action. 

Then click on the press key link.

A search input field will appear. Next, type the text “Beanie” and click on the PLAYING NEXT button. 

Then, press the enter key on the control centre to start the search, and the search result will display, as shown in the below screenshot.

Swiping

You can see the image of the first item in full by scrolling. To perform this action, first, select the anchor area “Search Results: Beanie” with the mouse and then swipe on the browser screen as shown in the above screenshot. Next, click on the Play It button to execute the action. It will verify that the image of the first item is visible in full.

Next, we are going to check whether the Beanie with the logo is visible with the price. Select the anchor area of the item, as shown in the below screenshot and click on the Play It button to execute the action. It will verify that the Beanie with logo is visible with the price.

Conclusion

Exit the editor by pressing the Done button. Click on the Run button to run the test. If the test passes, Congratulations! Otherwise, try to fix the test by editing it. Visit our documentation if you need help.

Posted on Leave a comment

Fixing WordPress Not Sending Email Issue

Have you faced an issue with WordPress not sending emails properly or at all? You are in the right place at the right time, as this article will show you how you get email up and running on your WordPress website.

Test Email on your Server

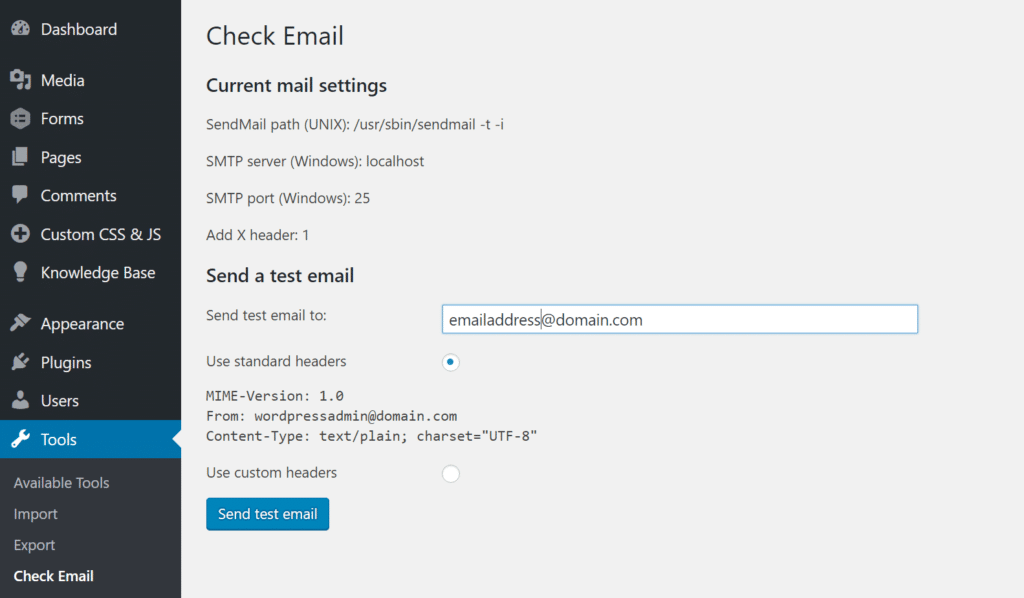
First, run a test on your WordPress site with a free Email Check plugin provided by WordPress itself. By running this test, you will know if your WordPress installation and the server can send emails. After installing the plugin, go the Tools menu under your WordPress dashboard and click Check Email. Enter an email address and click Send test email.

Check your email to see if you get the test the email. The subject of the email will be “Test email from https://yourdomain.com.” You should also check your junk or spam mail folder. If you find the email, then the issue of emails not sent in the past is probably due to misconfiguration or an incompatibility. You can check your WordPress mail settings or contact your plugin developer for help.

Use SMTP to Send your Emails

Here is another way to resolve the email issue in WordPress. There are several SMTP providers that you can choose from; they include Gmail, Mailgun, SendGrid, WPforms, etc. All you need to do is to download the SMTP plugin of any of these providers from the WordPress repository.

To install the plugin, go to Add New Plugin, click the upload tab, browse for the plugin file, click Install Now and hit the activate button.

Using Gmail SMTP

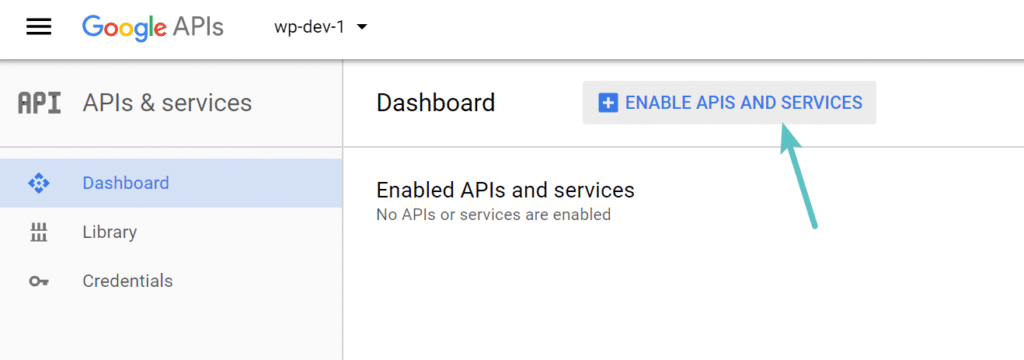
For Gmail SMTP, you need to authorize your WordPress installation to use Google’s servers. To do this, you have to create a set of secure credentials. Visit console.developers.google.com, log in to your Gmail account, Click My Project, and click the Add (+)to create a new project. In the dashboard of the new project, click Enable APIs and Services.

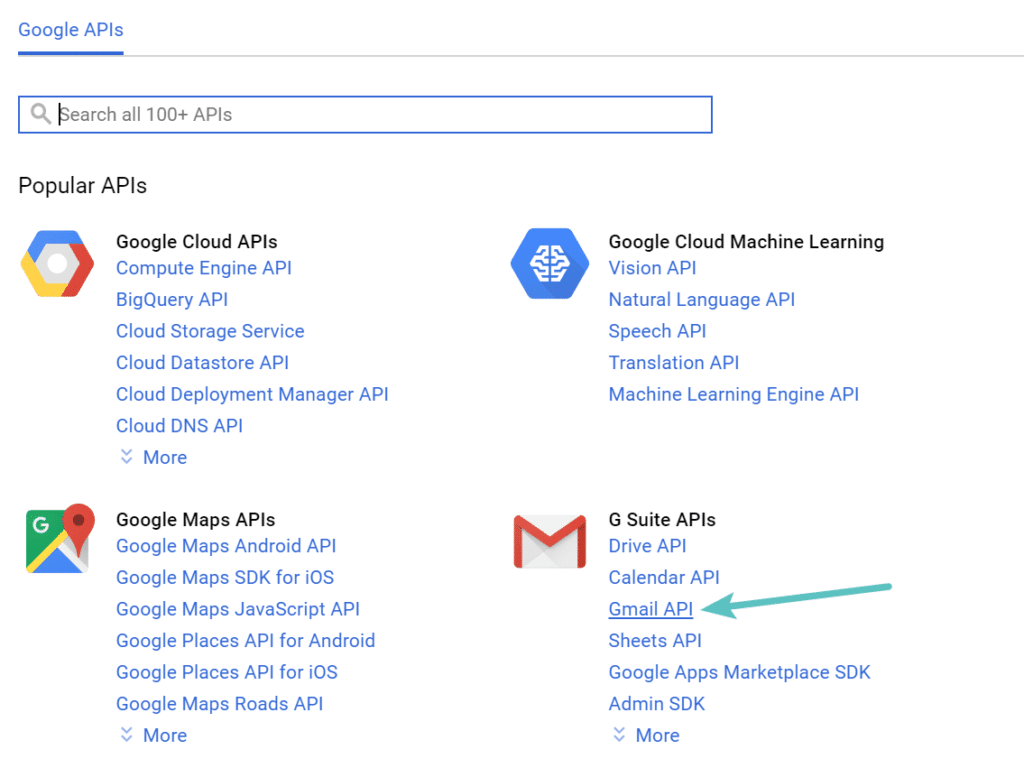
Click on Gmail API under G Suite APIs. On the next screen, click Enable.

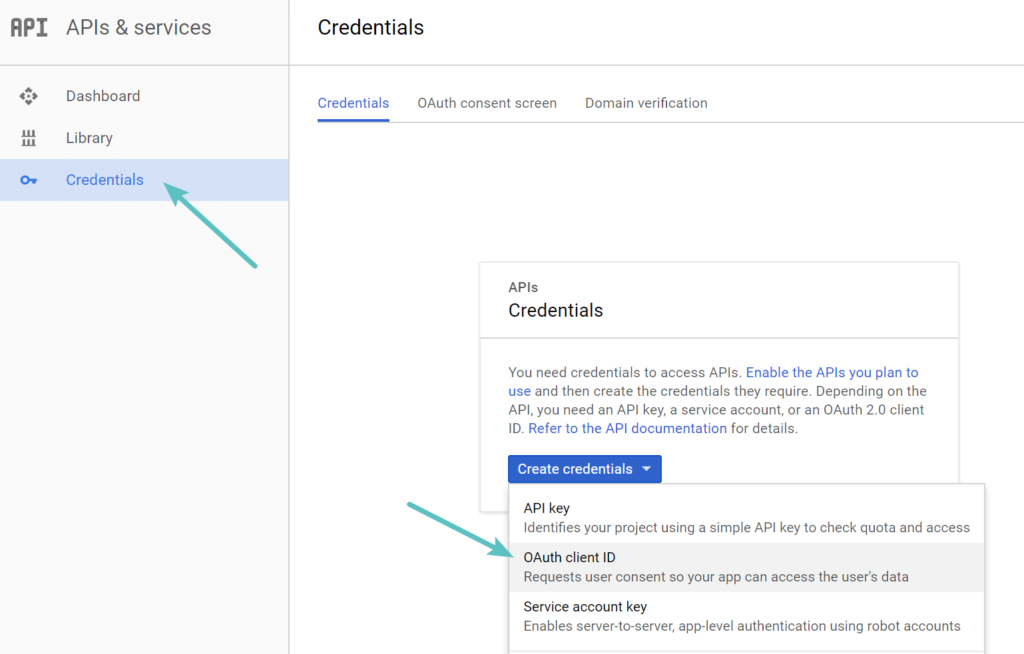
Next, click on Credentials on the left-hand side and under Create credentials, choose OAuth client ID. Then, click Configure consent screen.

Afterwards, input your email address, a product name, and a privacy policy URL. On the next screen, choose web application. Enter a name, paste the Authorized JavaScript origins URL, and the Authorized redirect URIs from the Gmail SMTP wizard on WordPress. Then click Save.

Once you do this, you will get your client ID and client secret. Copy and paste them into the fields on the Gmail SMTP wizard in on WordPress. Click Next and then, Finish. That’s all.

Posted on Leave a comment

How to Fix the WordPress Login Redirect Loop

On some occasions, you or your users may experience WordPress login redirect loop in which you are redirected back to the login screen after logging in. This prevents you from accessing the admin panel of your website. Therefore, you are unable to manage your site or create new content. Testup is here with three methods you can use to fix this issue.

Clear Browser Cache and Cookies

If your browser’s cache and cookies hold onto to outdated information and use old WordPress files, it can lead to WordPress login redirect loop. To clear your browser caches and cookies, take the following steps:

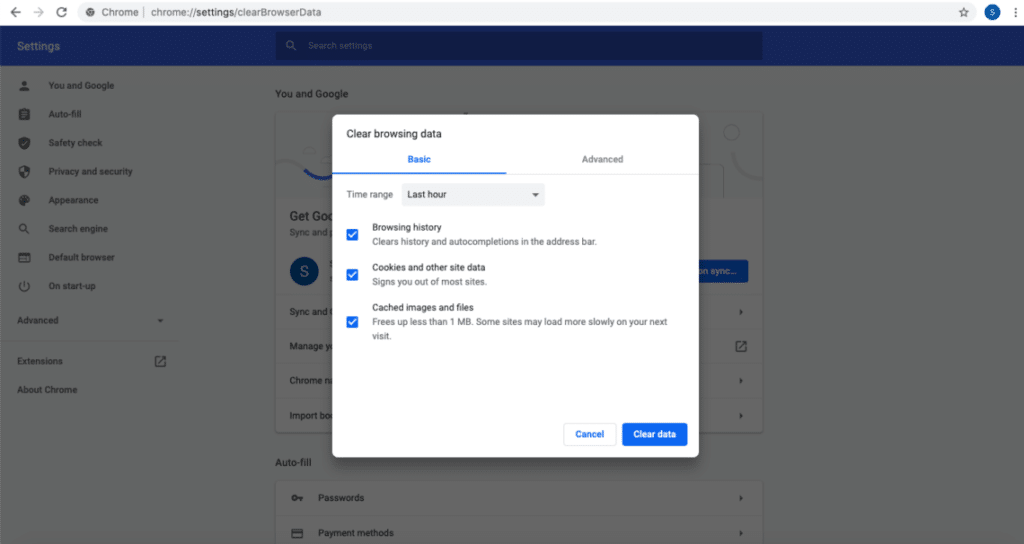
  • On Google Chrome, click the three dots at the top-right corner. Select More tools and click Clear browsing data.
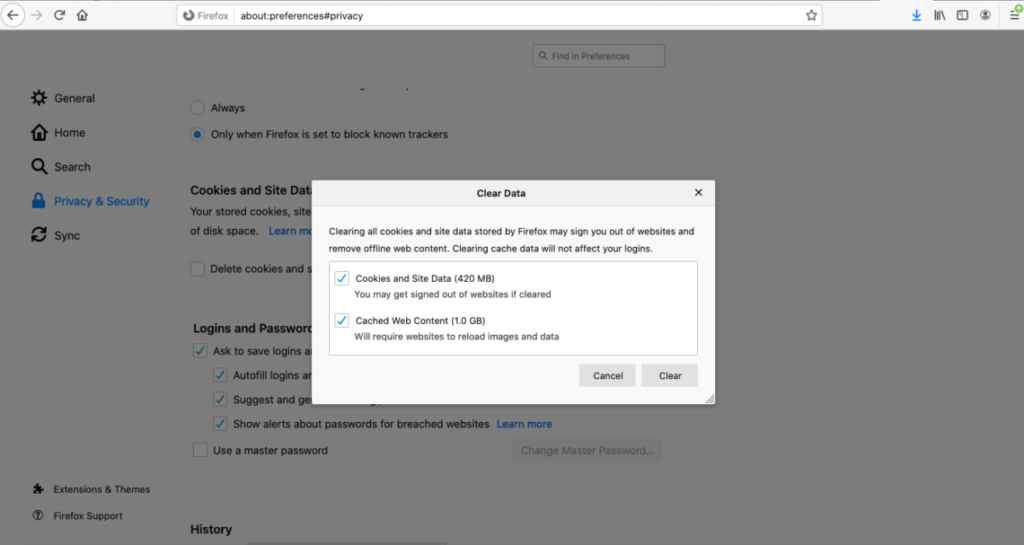
  • On Mozilla Firefox, click the three horizontal lines at the top-right corner. Go to Preferences, click Privacy and Security. Navigate to Cookies and Site Data and select Clear Data. Mark the options Cookies and Site Data as well as Cached Web Content; then, click Clear.
  • On Safari, go to Preferences, click on Privacy. Then, select Remove All Website Data and click Remove Now.
  • On Microsoft Edge, click the three dots at the top right corner and select History. Select Clear History; tick the options Cached data and files as well as Cookies and saved website data. After that, click Clear.

Restore Default .htaccess file

If you still see the login redirect loop after clearing browser cache and cookies, then you can restore the default .htaccess file. To do this, access the WordPress root folder through an FTP or a File Manager. Locate the .htaccess file and delete it.

Deactivate Themes and Plugins

WordPress login redirect loop can also be caused by conflicting or corrupt plugins or themes. To deactivate your WordPress plugins, access the websites’ wp-content directory through an FTP or a file manager. Then, rename the plugin folder to deactivate all plugins. To deactivate a theme, find the themes’ folder in your wp-content directory and rename the folder.

Posted on Leave a comment

CI/CD with WordPress

What is CI/CD?

Continuous integration (CI) and Continuous Delivery (CD) are a set of operating principals and best practices that allow teams to deliver changes to their applications faster and more reliably. Generally known as CI/CD or CI/CD Pipeline, this is an Agile best practice and an excellent way for teams to optimize their application deployments.

Continuous Integration

Continuous integration (CI) is the first part of CI/CD and consists of a set of best practices that enforce frequent check-in of code to version controlling repositories. This is important as many new applications consist of multiple components developed across many platforms and tools. To avoid the overheads of frequent commits and releases, CI provides ways to build and package applications quickly, so that teams can collaborate and test changes more frequently.

Continuous Delivery

Once CI is done, Continuous Delivery (CD) picks up the process and delivers new releases to relevant infrastructure through automated channels. It stores environment-specific parameters pertaining to the many environments that teams work with, such as dev, staging, and production. It then automatically pushes changes along the workflow as they are tested and accepted.

CI/CD with WordPress

One of the best things about WordPress websites is that almost anyone can manage them, despite not having any coding knowledge. Front end editors and WordPress plugins make this possible. But if your website is being updated constantly with new features and changes or a web developer who manages one or more websites of your clients, then the CI/CD process can save you a lot of time.

WordPress is no different from any other web application. It consists of code files and other static resources such as images, CSS, and JavaScript files. Introducing a CI/CD pipeline can save you time and streamline the change process.

A CI/CD Pipeline can also save you the time taken to transfer files via an FTP application like FileZilla and the additional time testing your changes and rolling them back in case of an error.

What are the tools/providers that help you with that task?

You’ll need two main types of tools to set up a CI/CD pipeline for WordPress. The first is a Version Controlling Service (VCS). This is a code repository (repo), with a few other useful features. All your code will be maintained in this repo, and you can use one of the most popular free version control services like GitHub or BitBucket, or set up your own in-house VCS.

The next step is the more important one, where you need to carefully select a CI/CD tool that suits your needs. The CI/CD tool will be triggered every time a change is made to the repo. It will process the changes, perform the necessary actions like preprocessing or packaging, and transfer the relevant files to the specified environment (Staging/Production, etc.).

Some popular options are:

Buddy CI/CD

GitLab

Branch CI

Setting up a CI/CD Pipeline for your WordPress website

This is not too difficult and requires just a few steps. Let’s look at using Buddy.

  1. Setting up Version Control
    Start by setting up your code in a VCS like GitHub. Maintain a “development” branch to commit your work in addition to the Master branch. Changes can be merged into the Master branch once they are approved.
    You will also need to disable front-end editors on WordPress, and its plugins as any changes done outside the VCS will be over-written with commits.
  1. Setup a Pipeline
    Buddy is free and quite user friendly. You can set it up with a buddy.yml file or use its GUI, which is even more intuitive. You can configure Buddy to perform many actions such as Lint PHP and JS code, preprocess CSS, and run npm commands for other frameworks.
  1. Deploying your changes
    Once all this is done, Buddy will transfer your new files to the relevant environment. A good practice is to have a separate Staging server on which you (or your clients) can verify that everything is working fine before merging changes to the Master branch and triggering an update to your Production server.
  1. Merging Database changes
    One of the more complicated parts of this process is updating your production database as it has continued to be modified in production while you made changes to a copy of it in your development environment. There are some plugins that can be used for this purpose. But you should look at setting up your own process to ensure that nothing is missed. You can read more about the complexities of this step, our solution, and some existing plugins here.
    In brief, we create a SQL or PHP script to migrate the database changes and commit it to the repo, like any other change. In addition, we maintain a migration table to ensure that no script is duplicated or repeated. We then need to add a step in our build process to execute any new migration files after all the files have been copied. This approach does require a good understanding of how WordPress code manages the database, so you should stick to a plugin if you aren’t equipped for that.

We hope you enjoyed our quick guide regarding the benefits of CI/CD for your WordPress website.

Posted on Leave a comment

How to Fix WordPress 500 Internal Server Error

What can be more frustrating than a website working perfectly seconds ago displaying 500 Internal Server Error? If you are at this crossroad, this article will explain the steps you can take to fix the error. But before you start, it’s good to make a complete backup of your site. If you are ready, here we go!

Deactivate all Plugins and Themes

Go to your dashboard and deactivate all your plugins. Check the website again; if it loads without internal server error, it means the issue was with one of the plugins.  Switch them one by one to know the exact plugin that caused the error. Also, you can switch to the default theme. If your site loads without an error, then the issue was with the theme.

Turn on Debugging

Another way to get rid of the error is to turn on debugging. You can do this by editing your site’s wp-config.php file. Access the file and search for WP_DEBUG. If you find it, then, set it to “true” as shown below. If you don’t find it, write it yourself. Either way, you should have the line shown below.

define( "WP_DEBUG", true );

Check your .htaccess File

Use your FTP to access .htaccess file in your WordPress root folder. Create a back up of the file and then delete the original file. Check if your website is back without error. If it is, then, the .htaccess file has issues. Go through it line by line to get the offending line. You may have to delete the line.

Other Options

If all the solutions discussed above did not bring the website back live. You can try other options like increasing your WordPress memory limit, clearing your browser cache, checking your server logs, or reinstalling your WordPress core.

Posted on

No-Code Test Automated Tool for Beginners

Do you know about automated testing but found it too hard? Then you have come to the right place. In this article, we are going to discuss a simple automated testing tool called Testup developed by us.

Let’s begin!

Why do users find automated testing hard?

Most users who find automated testing hard are due to the following reasons.

  1. The complexity of automated testing tools.
  2. Lack of coding skills as most of the automated testing tools require some coding skills.
  3. Requires a lot of time and resources to learn. 

What is Testup?

Testup is a visible test automation tool to test web applications, and it was developed and maintained by Thetaris GmbH, a group of software professionals. Further, you do not need to have any coding skills as Testup is a no-code automation testing tool. 

The following list shows some of the advantages of Testup.

  1. Easy set-up of the test environment as Testup is a very user friendly testing tool.
  2. Ability to test complex test scenarios with ease.
  3. Ability to test without writing any code.
  4. Requires less amount of time and resources to learn Testup. 

Hence, Testup is an ideal automated testing tool even for a user who found automated testing too hard.

Registration process

Before creating a project, you need to Register with Testup. The registration process is simple and straightforward, as shown below.

Visit the following URL to go to the Testup website. Next, click on the Get started free button, and it will redirect you to the registration page.

https://Testup.io/

Then, enter your email address and click on the Register button to create a new free account.

Creating a new project

After completing the registration process, click on the Go to App button and it will redirect you to a new browser window where you can create a new project.

Next, create a new project by clicking the Create project link. To rename the project, click on the edit icon and rename.

Creating a new test

Click on the Create Test link to create a new test and fill the parameters such as URL, etc. as per the requirement. To rename the project, click on the edit icon and rename.

For the demonstration purpose, we have used the following dimensions. Then click the Edit button, and it will redirect you to the Testup editor.

Dimensions: iPhone 6/7/8

Recording a test

Testup Editor

Before recording a test, you need to understand the Testup editor. There are three parts of the editor, as shown below.

  1. The left side of the editor – It contains the browser window of the website you want to test.
  2. The right side of the editor – It consists of the list of checks and inputs.
  3. The top of the editor – It is the control centre which contains all the executable commands.

Check with an anchor area

Selecting an anchor area helps the editor to verify that the website is correctly loaded and ready to perform the next action.

In this example, we are going to check three anchor areas, as shown below.

Check if the brand name “Testup Merchandize” is visible

Select the anchor area of the brand name (Testup Merchandize) with the mouse, as shown in the above screenshot. Next, click on the Play It button to execute the action.

Check if hamburger menu is visible

Select the anchor area of the hamburger menu with the mouse, as shown in the above screenshot. Next, click on the Play It button to execute the action.

Check if the welcome image is visible

Select the anchor area of the welcome image with the mouse, as shown in the above screenshot. Next, click on the Play It button to execute the action.

Clicking

Select the anchor area of the search icon with the mouse, as shown in the above screenshot. Next, click into the search icon. Then, click the Play It button to execute the action, and you’ll see a search input field appear above the search icon.

Text input for a search function

Select the anchor area of the search input with the mouse, as shown in the above screenshot and click into the search input. Next, click on the Play It button to execute the action. 

Then click on the press key link.

A search input field will appear. Next, type the text “Beanie” and click on the PLAYING NEXT button. 

Then, press the enter key on the control centre to start the search, and the search result will display, as shown in the below screenshot.

Swiping

You can see the image of the first item in full by scrolling. To perform this action, first, select the anchor area “Search Results: Beanie” with the mouse and then swipe on the browser screen as shown in the above screenshot. Next, click on the Play It button to execute the action. It will verify that the image of the first item is visible in full.

Next, we are going to check whether the Beanie with the logo is visible with the price. Select the anchor area of the item, as shown in the below screenshot and click on the Play It button to execute the action. It will verify that the Beanie with logo is visible with the price.

Conclusion

Exit the editor by pressing the Done button. Click on the Run button to run the test. If the test passes, Congratulations! Otherwise, try to fix the test by editing it. Visit our documentation if you need help.