Category: Documentation
Videotutorial 02: Editing a test and basic functionalities
Videotutorial 01: The Basics, Creating a test
Test an iOS App
Testing your own Android or iOS app requires to create a test with a mobile device and adding a reference to the uploaded file.
Upload file
- Get your <API Key> from Profile Page (Details)
- Upload a
.zipor.tar.gzfile containing your compressed.appbundle.Your .app bundle must represent a simulator build of your app. After running in iOS Simulator via Xcode, look in
~/Library/Developer/Xcode/DerivedData/<project-name>/Build/Products/Debug-iphonesimulator/.Alternatively, you may run
xcodebuild -sdk iphonesimulator(if you use .xcodeproj) orxcodebuild -sdk iphonesimulator -workspace Sample.xcworkspace/ -scheme <your-scheme> -configuration Debug(if you use .xcworkspace) in your project directory, then zip the .app bundle inbuild/Debug-iphonesimulator/. - Upload ZIP using the following curl commands
curl "https://app.testup.io/uploader/new?ApiKey=<API_KEY>&platform=ios" -F "file=@app-release.zip"This curl command returns a JSON with <publicKey>.
You can update an existing APK using this <publicKey> with:
curl "https://app.testup.io/uploader/update/<publicKey>?ApiKey=<API_KEY>&platform=ios" -F "file=@app-release.zip"Create and link test
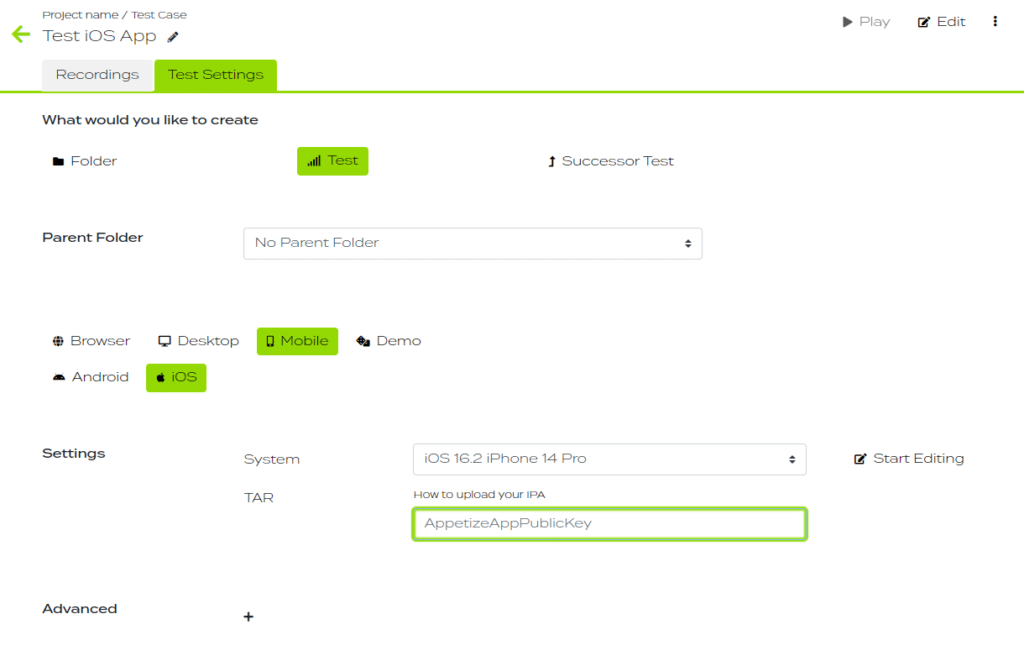
- Create a new Test
- Select Mobile System
- Select the iOS device you need
- Insert AppetizeAppPublicKey = <publicKey>

Create your Test
Click “Start Editing” on right of the selected mobile device
Test an Android App
Testing your own Android or iOS app requires to create a test with a mobile device and adding a reference to the uploaded file.
Upload file
- Get your <API Key> from Profile Page (Details)
- Go to your developer console and create an APK, call it e.g. “app-release.apk”:
After your app is built, either via Android Studio or by running the command./gradlew assembleDebugin your project directory, look in<project-name>/<module-name>/build/outputs/apk/ - Upload APK using the following curl commands
curl "https://app.testup.io/uploader/new?ApiKey=<API_KEY>&platform=android" -F "file=@app-release.apk"This curl command returns a JSON with <publicKey>.
You can update an existing APK with:
curl "https://app.testup.io/uploader/update/<publicKey>?ApiKey=<API_KEY>&platform=android" -F "file=@app-release.apk"Create and link test
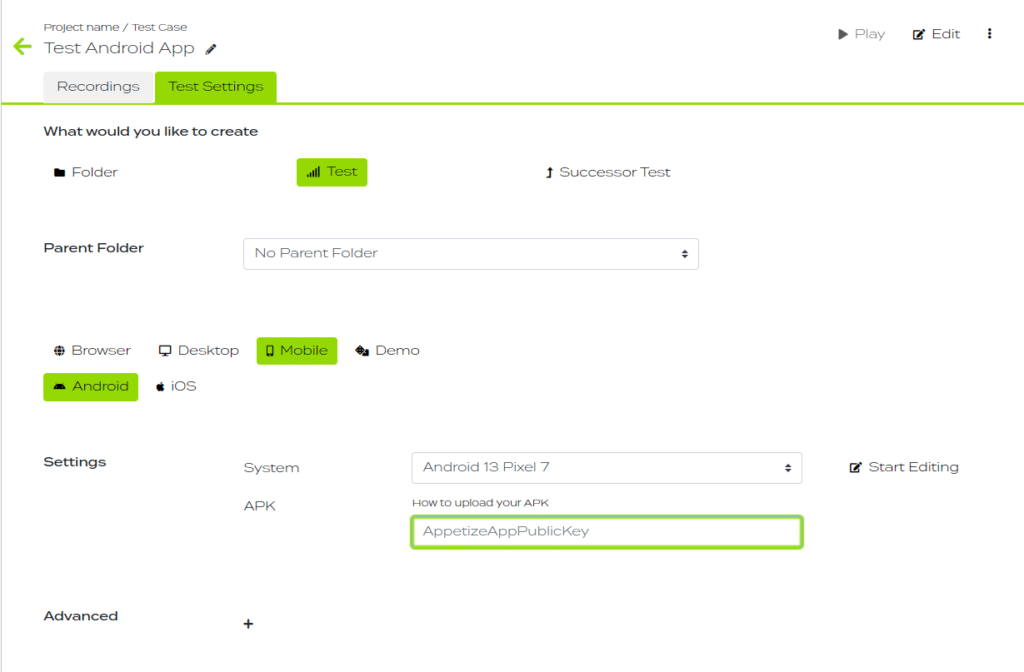
- Create a new Test
- Select Mobile System
- Select an Android device you need
- Insert AppetizeAppPublicKey = <publicKey>

Create your Test
Click “Start Editing” on right of the selected mobile device
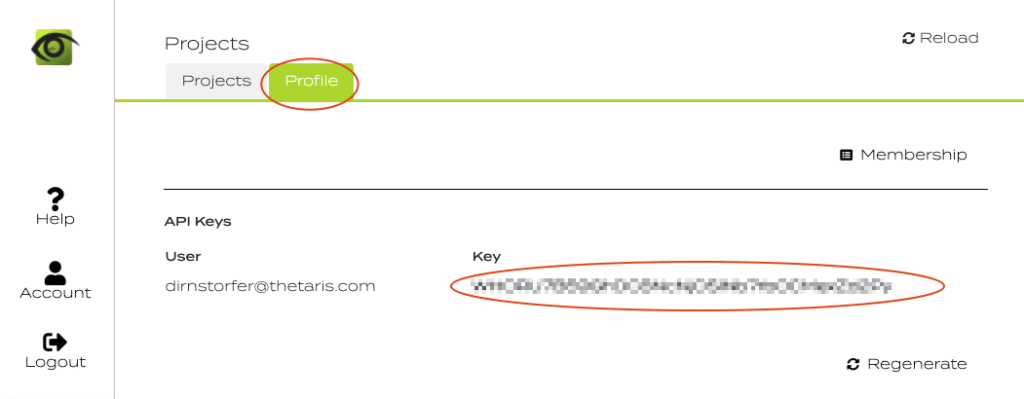
Get your testup.io API key
Go to your testup.io start page and click on the “Profile” tab. Find your ApiKey and the section “Api Keys”

PHP: How to manipulate with data (Experimental feature)
In Editor-> Control->EVAL create an EVAL action. This action can compute PHP functions using data from Control->Data and from CLIPBOARD.
EVAL argument is a PHP 5 expression. See https://php-legacy-docs.zend.com/manual/php5/en/index on how to write php
The result of the expression is returned to the CLIPBOARD
Working with Data
Data from Data Tab in Editor can be read from the test to the clipboard.
E.g. setting
FirstName: Barbara
LastName: Mustermann
Age: 26
Read Data
EVAL $FirstName
Reads the value of the FirstName (“Barbara”) into the CLIPBOARD. Note that there is a “$” in front of the variable name using the EVAL command.
Manipulate Data
EVAL $FirstName." ".$LastName
Concatenates $FirstName, ” “, $LastName using the “.” as usual in PHP and returns the result to the CLIPBOARD.
Compute with Data
EVAL $Age + 10
Adds 10 to the variable Age. In the example with Age = 26, this command returns 36 to the CLIPBOARD.
PHP Examples
Measure time between steps
EVAL microtime(true)
:
EVAL microtime(true) -  $CLIPBOARD
Returns the time passes in seconds to CLIPBOARD.
Call PHP for TimeStamp
EVAL date_format(new DateTime(), "d.m.Y H:i:s");
Returns a timestamp to CLIPBOARD
Call Java for TimeStamp
EVAL new Java("java.util.Date")->toString();
Returns a timestamp to CLIPBOARD
Manipulate strings
EVAL substr($CLIPBOARD, 0,strlen($CLIPBOARD)-5)
Removes the last 4 characters from CLIPBOARD
Set and Get values from data store
EVAL set("result")
Sets the Clipboard value to a temporary result variable
EVAL set("result", "some value")
Sets a specific value
EVAL get("result")
Gets the current value.
EVAL set("result", get("result") ."\r\n". $CLIPBOARD)
Updates the result by concatenating the current value with a new one.
Create random Emails
To create a random Email use button. The values are stored in buffer – clipboard content – and then can be pasted into your test.
Insert random Email into a test.
Make sure you are in mode.
- Activate a field where the random e-mail is to be inserted.
- Switch to mode.
- Click .
- Enter the following PHP Timestamp:
EVAL "example+".microtime(true)."@testup.io"5. Click on
to add created e-mail with random number.
Notifications
Get notifications for automated run
Make sure you open a schedule that runs automatically.
- Open tab “Notifications” .
- Check the box “Send Notifications”.
- Choose between “all runs”, “failed runs”, “passed”, “manual” or “disabled” in drop down menu.
- Choose between “Email”, “Slack”, “Microsoft Teams” or “Discord” in the next drop down menu.
- Insert your email or a unique URL created with Incoming Webhooks in Slack, Microsoft Teams or Discord (ex. https://hooks.slack.com/services/xxx/xxxx).
Please notice: you need to open Slack/Microsoft Teams/Discord settings to configure Incoming Webhooks and to create a unique URL. Check installation instructions here:
Using schedules for grouping
Group your tests
To play several tests simultaneously, group them by using schedule.
- Click .
- Add tests to the schedule.
- Open newly created Schedule and rename it.
- Go back to execution page.
- Click to run group of tests.
